
Behind the Scenes: polishing 3D prints


Once a piece of jewelry has been designed and 3D-printed, whether it’s from one of our collections or a custom-made design, there’s still a lot left to do, like quality-checking, polishing/tumbling, dyeing, spray-coating, and assembly, if required… Perhaps we’ll talk about some of those later; but today we thought we’d explore the tumbling process we use to make our jewelry perfectly smooth.
We use a vibratory tumbler with ceramic media in-house to polish 3D-printed pieces. The model we have is the Raytech Adjusta-vibe 25SS. This video shows how the pieces cycle through the machine. As the soft plastic 3D prints rub against the harder ceramic cylinders, small amounts of material are removed from the surface of the prints, eventually making them smooth.
Tumbling 3D prints is a lengthy process — it takes several hours per batch — and in order to ensure a smooth, consistent finish, the jewelry and tumbling medium need to be rinsed regularly. At first we were doing this by adding water with each batch and draining it afterwards, but this method can leave powder and deposits on the pieces, ultimately resulting in inconsistent polishing results.
You can buy a system to hook up to a tumbler that constantly feeds water through it, but they’re bulky/hard to fit in small places, and quite frankly, most are crazy expensive. So we decided to design and make our own!
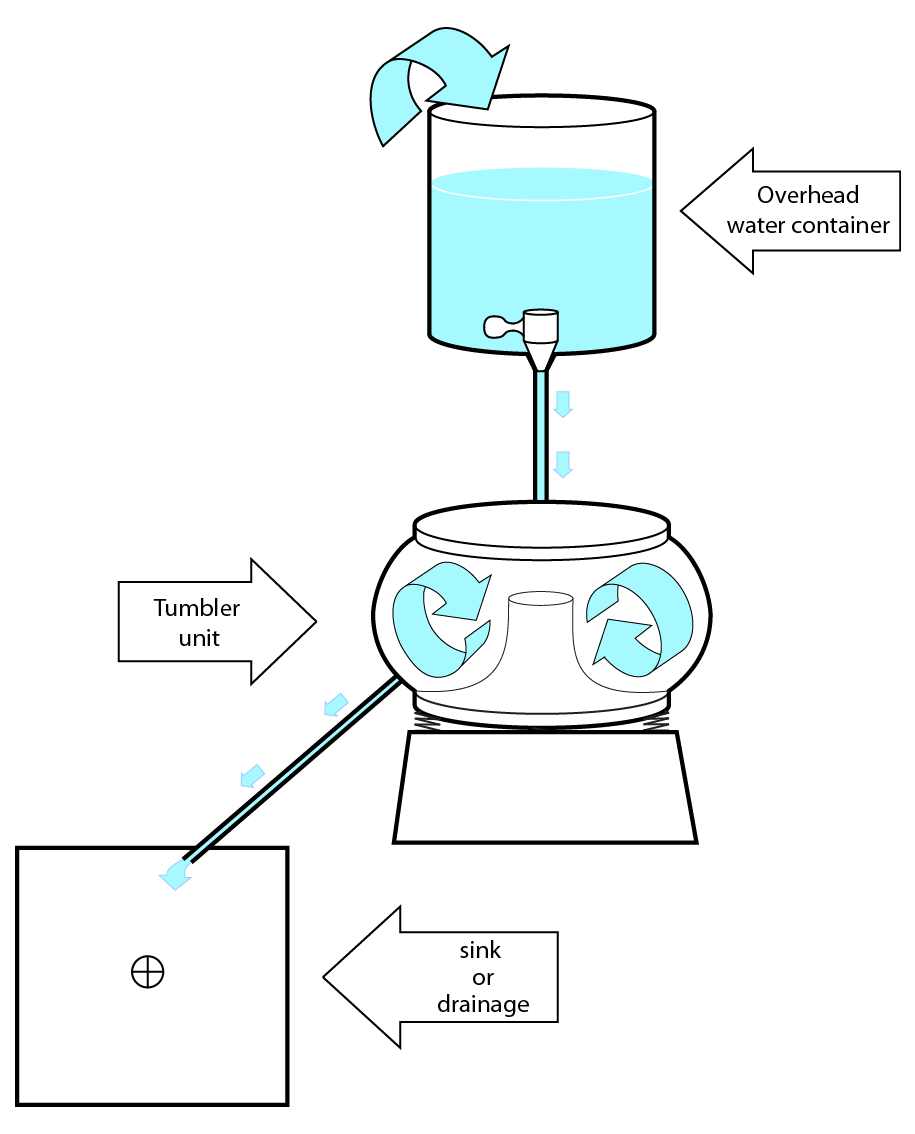
Water is stored in a large bucket on a shelf above the tumbler, and fed through an adjustable valve and hose into the tumbler. Another hose carries used water into our utility sink. Once the system is set up and running, it’s gravity-fed and self-regulating. The amount of water in the basin is maintained throughout the polishing cycle, and the user simply needs to tune the flow rate to ensure it will last a minimum chosen cycle time. Through trial and error, we have ours adjusted for an 8hr day.
Building the system was dead easy: You can buy a kit from a hardware store that comes with some or most of the parts; but since we wanted a custom fit for our space, we simply bought everything separately, and it wound up even cheaper than the kit. Here’s the parts list, if you’d like to build your own!
-
1 – Appropriately-sized bucket. Five gallons is nice, because it lasts all day for a tumbler our size, but any bucket that suits your needs (and one that you don’t mind putting a hole in) is fine. Since the bucket has to be up high, make sure it’s at least a little transparent, so that you can tell how much water is in it without having to jump up and peer in!
-
2 – Appropriate lengths of 3/8″ PVC hose. You’ll need enough to run from the bottom of the bucket to the tumbler, and the tumbler to the sink/drain.
-
1 – Adjustable spigot: the type home-brewers use for extracting beer from their buckets works great. Thanks to the home-brewing crowd, it’s easy to get one of these that fits nicely into a standard bucket!
-
Clamps to hold the hoses in place
-
Silicone caulk to seal around the hole in the bucket and the spigot
-
Sturdy shelf or table that sits above the height of your tumbler
-
(Optional: Pump. You can make your flow-through system pump-fed instead of gravity-fed, if you’d rather store the bucket on the floor. However, you’ll pay an extra $20-40 for a pump that can sit in the bucket to do this.)
So now you know one of the things we do to achieve a silky smooth finish on our 3D-printed jewelry! Each piece that comes through our studio is inspected carefully through every step of the process, including before, during, and after tumbling. As a result of tumbling in-house, we are able to receive our 3D prints faster and process your custom orders quicker.
Here’s a diagram of how our flow-through system works:
Gaby
Awesome! thanks for sharing,
would this work for fdm?
Marie Staver
Hi Gaby! You can put FDM-printed parts in a tumble polisher, and it will make them smoother, but it doesn’t take off the strings or smooth out any big protrusions. They come out looking nicer, but not as nice as an SLS piece.
I hope that’s helpful; thanks for the question!
Marie
Scott Janousek
Depending on type of plastic, FDM parts in a tumbler (with ceramic media, etc) will remove some striation, but it really depends on what quality of output you can get off your machine and what type of tumbler you have. Also, parts tend to get dirty in nooks and crannies, if you don’t clean your media.
Chemical processes (sometimes slightly hazardous), or fine sanding (labor intensive) will produce better surface result for low volume printing with hobbyist level FDM 3-D Printers. You’ll lose some detail depending on how careless you are in post production cleanup.
Some high end FDM machines have custom finishing stations, and sometimes that involves blast media which give a great finish.
If you want a nice surface result without a lot of post process finishing, consider SLA or SLS machines.
Nick
Awesome post! Have you ever tried, or heard of someone trying, bead blasting your nylon parts?
Jessica
Yes, that is a pretty common finish done at service bureaus. In fast, I think Shapeways uses bead blasting as part of their depowdering process. I don’t think it gets as fine a surface finish as 4 hours of tumbling though.
Kate
Great description and gorgeous jewelry! I’ve got seashells printed in gypsum powder (sealed with super glue) and in PLS plastic. I’ve got access to tumblers in a geology department but the tech says all different kinds of tumbling media are used in them. Can you recommend what tumbling media (ceramic? sand? other? size?) would work best for these materials?
Jessica
hi Kate,
I would be a bit worried about putting gypsum powder prints in water…most tumbling processes are done with water and tumbling media.
Hannah
Love the video, such a cool process! Would it work for flat sterling silver pendants do you think?
Margaret Swanson
Hi Hannah,
We polish our flat steel jewelry in a slightly different kind of tumbler using stainless steel media instead of ceramic. The process is much simpler, since there’s no need for any kind of flow-through setup, and it would also be appropriate for silver jewelry. You can read a good overview of that kind of tumble polishing here: http://www.hodgepodgerie.com/tumble-polishing.html